Xanga Install Guide
Statcounter provides customisable hit counters, visitor tracking, web analytics and website stats for Xanga.

- Sign up for an account at Statcounter to get your code.
- Copy the StatCounter code.
- Log into your xanga account (opens in a new window).
- Note that there are TWO versions of xanga:
-Old Version (no themes)
-New Version (uses themes)
- When logged into your xanga account, click "Look & Feel" in the left navigation bar, under the "Edit" menu.

- If you can't see a "Look & Feel" link, then you have probably been brought to the NEW xanga private page by default. Click "Back to Old Private Page" and then click "Look & Feel" as described above.

- In the "Look & Feel" section you will notice a reference to the "old system" - this indicates that you are still using OLD xanga.

- Scroll to the end of this page to the "Website Stats" module and paste your StatCounter code into the module.

- Click "Save Changes" and that's it!
- Note that with the NEW version of xanga you must use the HTML-only version of StatCounter - this is because xanga does not currently allow the use of javascript codes with NEW xanga blogs.
- If you didn't already choose the HTML-only code, please re-generate the correct StatCounter code making sure to choose HTML-only code when prompted.
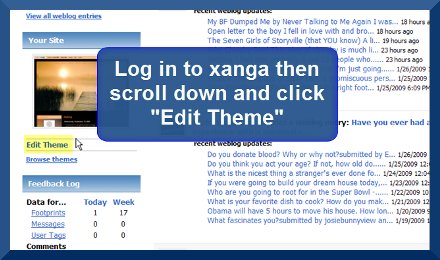
- When logged into your xanga account, click "Edit Theme" in the left navigation bar.
- On the next page, in the top left of the screen, you should see a "checked" box beside the text "make this your active theme" - this indicates that you are using NEW xanga. (UNcheck this box and click "Save" to go back to using OLD xanga.)

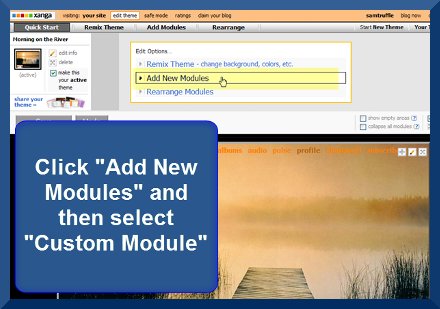
- Click "Add New Modules" and then select "Custom Module".
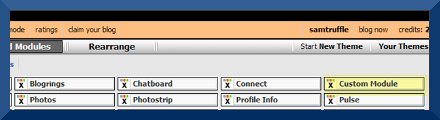
- Paste your StatCounter code into the Custom Module and click "Done".

- Click "Save" and that's it!
In both cases above, your StatCounter will now begin recording visitor information and, if you chose the visible option, your counter will be visible on your xanga blog!

To assist you further, we’ve also put together a video tutorial which you can see below…
Get Started
Sign up for a Statcounter account using our Xanga installation guide.
Try it for FREE!Already a Member?
You can reinstall Xanga on your Statcounter project.
Installation Guides A - Z
- Adobe Contribute
- Adobe Muse
- Adobe Pagemill 3.0
- Adobe Portfolio
- BBEdit
- Beep
- BigCommerce
- Blogger
- BluDomain
- Britnett
- BuilderAll
- Cargo Collective
- Carrd
- Chime CMS
- Cloudflare Zaraz
- ClubRunner
- ComfyPage
- Concrete CMS
- create.net (DoYourOwnSite)
- Default
- deviantART
- Dreamweaver
- DreamWidth
- Drupal
- Duda
- eBay
- Ecwid store
- Exposure.co
- Expression Web
- Facebook Instant Articles
- Format.com
- Frames
- Frontpage 2000
- Frontpage 2002
- Frontpage 97/Express
- GoDaddy
- Google Sites
- Google Sites (new)
- Google Tag Manager
- Homestead
- HoTMetaL Pro
- HubSpot
- IMCreator
- iWeb
- iWeb (alternative)
- Jimdo
- Joomla
- Magento
- Media Wiki
- Microsoft Office Live
- Microsoft Publisher
- Moodle
- MSN Groups
- MSN Spaces
- Multiply
- MyBoomerPlace
- Net Objects Fusion
- Netscape Composer
- NVU editor
- OJS 3.1 (Open Journal System) Install Guide
- Online Picture Proof
- OpenCart
- PBase
- Photodeck
- PhotoShelter
- Posterous
- Prestashop
- ProPhoto Blog
- Qufoto
- Rapidweaver
- React
- Register.com
- Sandvox
- Serif Webplus 10
- Shopify
- Showit
- SingSnap
- Site123
- SiteSkins
- SmugMug
- Sparkle
- squadhelp
- SquareSpace
- Tagged
- theimagefile
- Tripod
- Tumblr
- TypePad
- Typo3
- vBulletin
- Vistaprint
- Visual Page 2.0
- Volusion
- Webflow
- Webnode
- Webs
- webShaper Install Guide
- Website X5 Pro
- WebStarts
- Weebly
- Wikispaces
- Wix html5 version
- Wix Premium
- WordPress
- WordPress.com
- WordPress.org
- Xanga
- Xara
- Xenforo
- Yahoo! Online Store
- Yahoo Groups
- Yahoo! Site Builder
- Yahoo Small Business
- Yola
- Yuku
- Zencart
- Zenfolio
- Zine Studio